By Mark Darby
Originally crafted November 2024
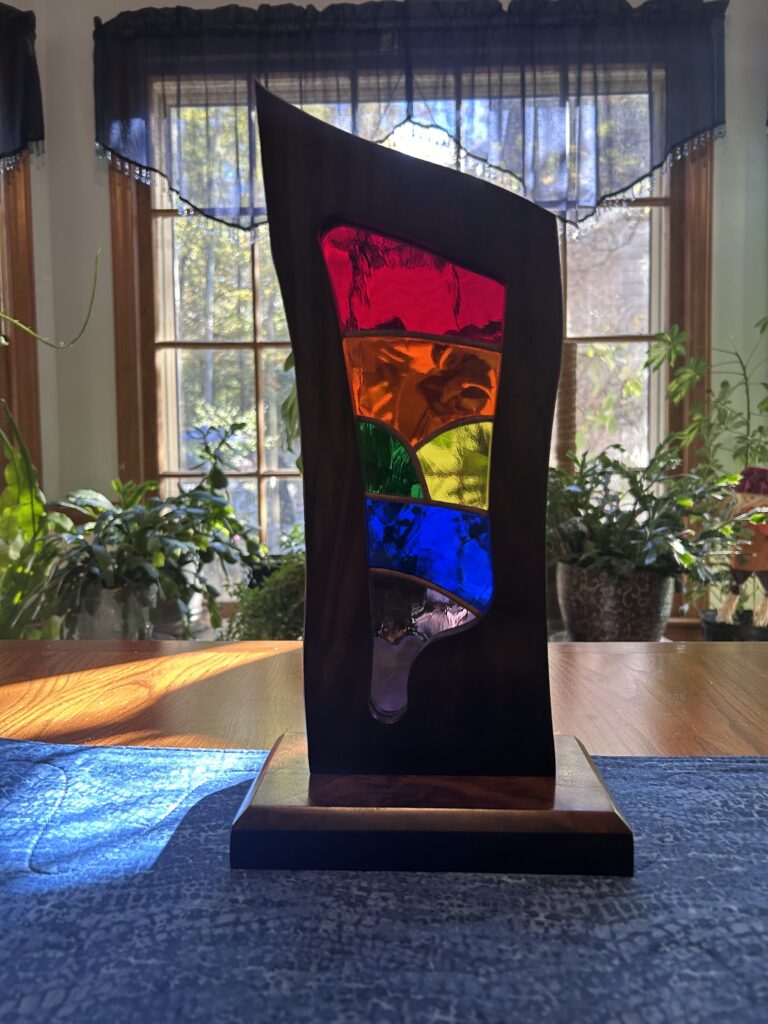
This woodworking and stained glass piece introduces the idea of combining complimentary materials and skills into an interesting artistic item.
This past Christmas, I set out to create something truly special for my son—a gift that would blend craftsmanship, nostalgia, and a touch of holiday magic. The inspiration came from a Pinterest post that sparked a memory: nearly 30 years ago, I dabbled in stained glass. I figured, “How hard could it be to pick it back up?” Spoiler alert: it’s not like riding a bike.
From Sketch to Sparkle
The journey began the old-fashioned way—with pencil and paper. I sketched out a full-sized model of the design, trying to visualize how the stained glass would interact with the wooden frame. This hands-on approach helped me better understand the proportions and flow of the piece before moving to digital tools.
Once I had a rough concept, I created a scaled-down version from 3/16″ plywood and shared it with my wife and daughter. Their feedback? “It’s beautiful… but huge.” Fair enough. I took their advice to heart, resized the design, and recreated the stained-glass pattern using Apple Keynote. I printed the pattern on legal paper, cut it into individual pieces, and used them as templates for cutting the glass.
Each piece was carefully taped to the glass, scored, snapped, and ground to shape. Then came the copper foil wrapping and soldering—steps that brought back memories and reminded me just how much I’d forgotten over the years.
Framing the Light
For the frame, I turned to a leftover piece of 8/4 black walnut from our fireplace mantle. After flattening and planing, I traced the glass pattern onto one half, drilled pilot holes, and used a jigsaw to cut out the shape that would cradle the glass. Cutting walnut this thick was a challenge.
I re-sawed the walnut and routed a pocket into one half to hold the stained glass securely—hiding the copper edges of the glass for a clean, elegant look.
Lessons in Precision
Here’s where things got tricky. I cut the pocket a bit too large, and the glass didn’t fit – the glass was too small and didn’t reach the edges. I had the choice to cut more glass or cut more wood. I had no more wood left, so the decision was easy. Back to the grinder I went. It was frustrating, but also a great refresher after three decades away from the craft.
Once the glass fit snugly, I glued the walnut halves back together, masked the glass with painter’s tape, and applied eight coats of high-gloss lacquer. The finish gleamed like a polished heirloom.
The Final Touch
I built a base and used a domino (un-glued) and a single screw to attach the top to the bottom. This eliminated any worry about cross-grain wood strain. It was simple, sturdy, and easy to disassemble if needed.
This project was a labor of love, combining woodworking and stained glass into a keepsake I hope my son will treasure for years to come.
Tips for Woodworkers Interested in Stained Glass Projects
- Start Small: Begin with a modest design to get comfortable with glass cutting and soldering.
- Use Templates: Digital tools like Keynote or PowerPoint are great for scaling and printing patterns.
- Create a Full-Sized Model: Sketching a full-scale version on paper helps visualize proportions and spot design issues early. Creating a full-sized physical model allows you to set it on a shelf or counter top and see how it will fit in with your decor.
- Protect the Glass: Use painter’s tape during finishing to avoid lacquer overspray or scratches.
- Practice Patience: Mistakes are part of the process—embrace them as learning moments.